How to Get IP Geolocation in JavaScript (Node + Browser)
Get IP geolocation in JavaScript the right way: the official SDK in Node.js, the correct browser pattern without exposing your key, the visitor's real IP via Express and Next.js, and the location, time zone, currency, ASN, VPN, proxy and threat data the API returns.
IP geolocation in JavaScript means turning an IP address into location, time zone, currency, and network data, in Node.js or the browser. It is a different thing from the browser's navigator.geolocation, which asks the user for GPS permission. This tutorial covers the IP kind: no permission prompt and a free tier to start.
With the IP Geolocation API and its official JavaScript SDK, a single call returns where an IP is and the network that owns it, with optional VPN, proxy, and threat signals on paid plans. Developers reach for it for localization, fraud checks, analytics, and access control. The core lookups run on a free key (1,000 a day, no card); the paid extras are flagged where they appear.
TL;DR
- Get IP geolocation in JavaScript: install
ip-geolocation-api-javascript-sdk, create anIpGeolocationClientwith your API key, calllookupIpGeolocation({ ip })in Node.js, and readresponse.data.location,timeZone,currency, andasn. Run it server-side so the key stays private. - Node vs browser: keep the key in an env var and look up server-side. In the browser, call your own backend or use request-origin auth (paid). Never ship the key in front-end code.
- Visitor IP: behind a proxy or CDN, set a scoped
trust proxyin Express (or read the platform header in Next.js), then geolocate that IP. - Free vs paid: 1,000 free credits a day (reset at 00:00 UTC), no card; VPN, proxy, threat, abuse, and bulk lookups are paid.
- No SDK: call
https://api.ipgeolocation.io/v3/ipgeowithfetch, key kept server-side.
IP geolocation vs the browser Geolocation API
The browser Geolocation API (navigator.geolocation) returns device coordinates from GPS, Wi-Fi, or cell signal. Its accuracy depends on the device and the signals available, from a few meters with GPS to much coarser with Wi-Fi or cell data. It runs only in the browser and requires the user's permission; the browser shows a prompt unless the user has already allowed or blocked location access for the site. IP geolocation takes an IP address and maps it to a city-level location plus the owning network. It needs no permission prompt and runs server-side or in the browser, so it fits localizing content, screening traffic, or enriching logs without asking anyone for anything.
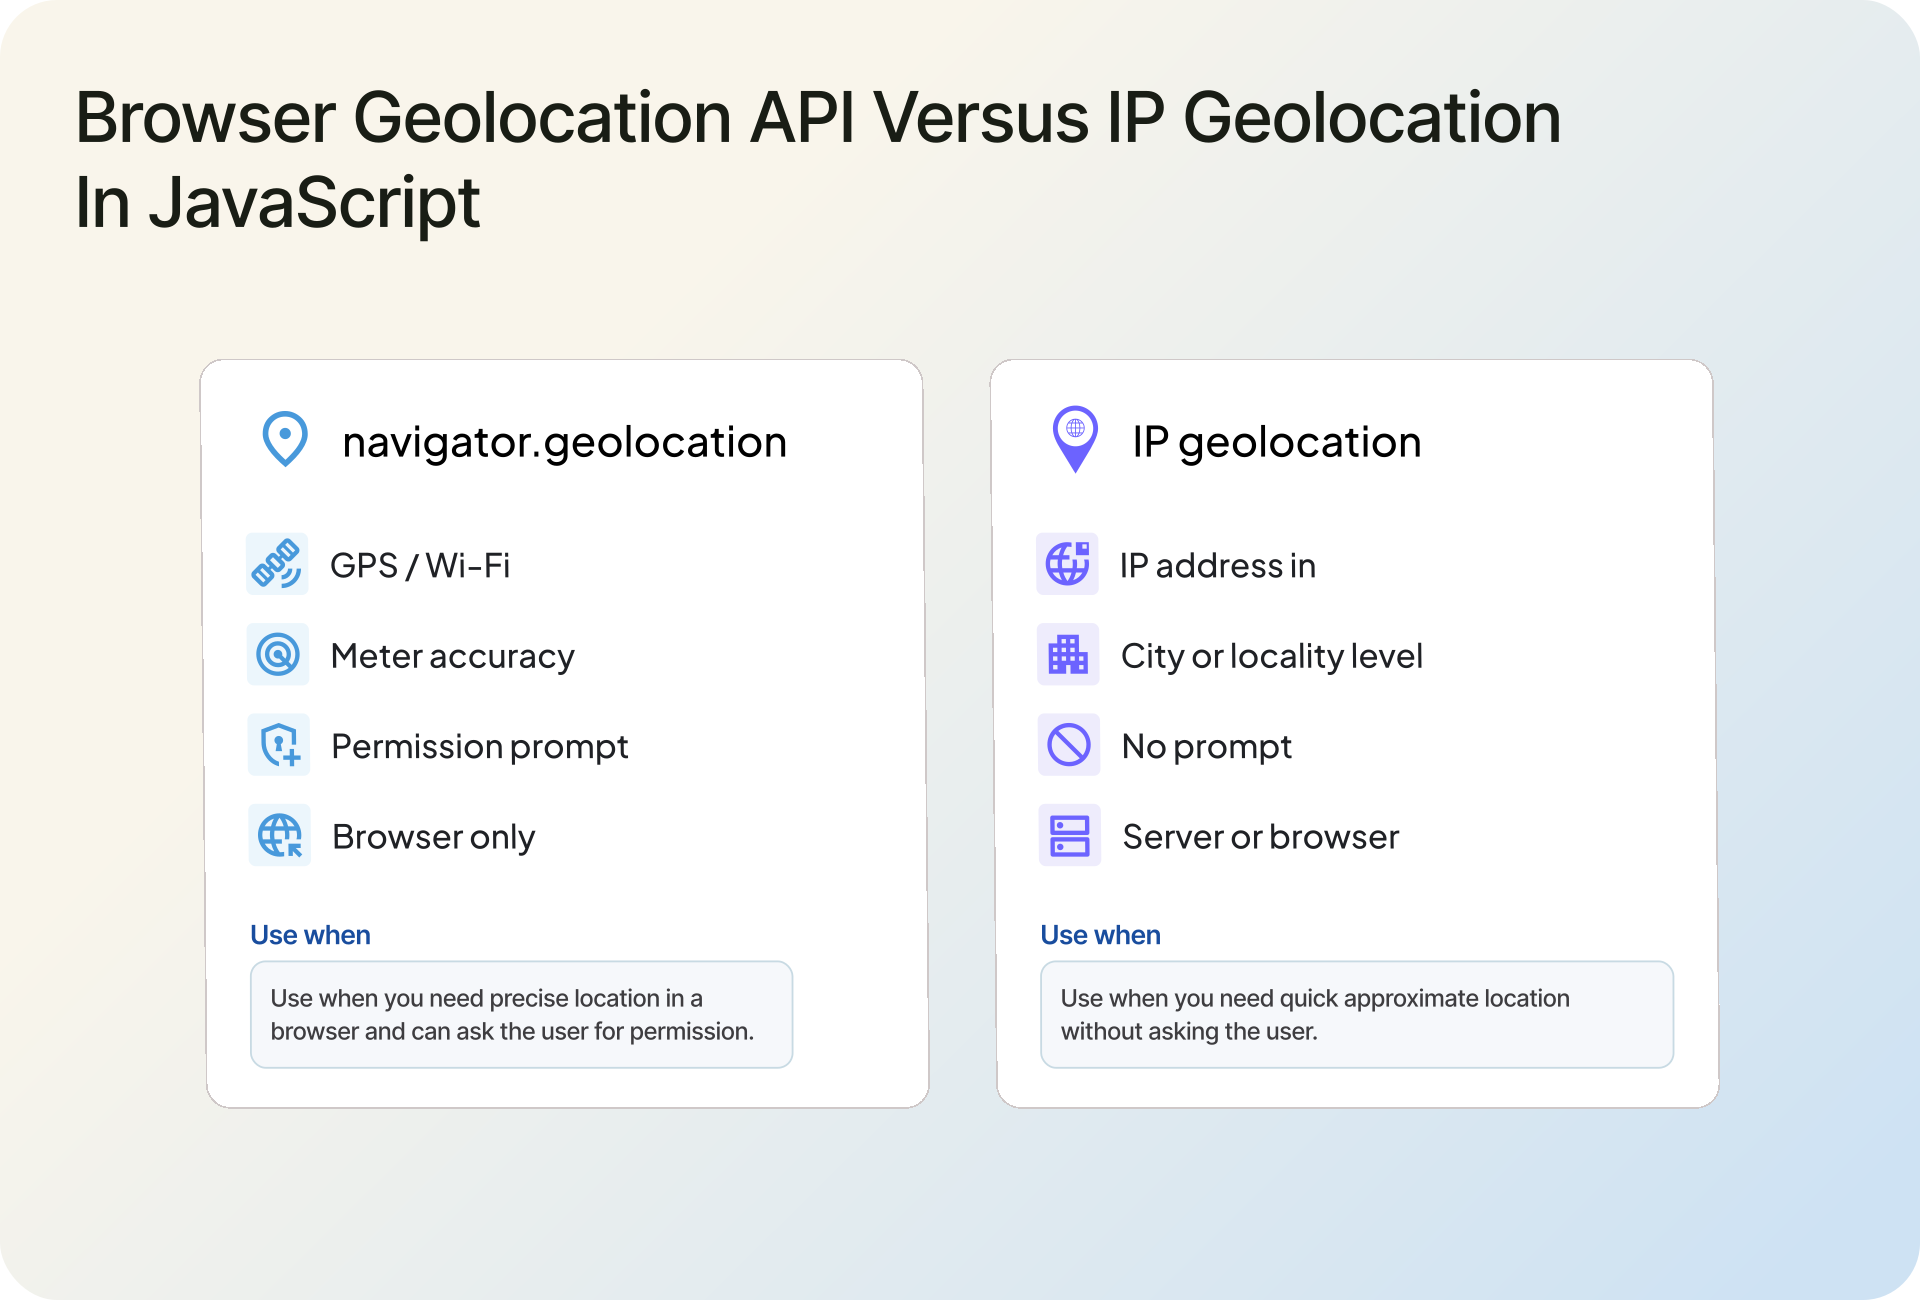
City-level is the honest expectation for IP data; it is not a GPS replacement. For how that accuracy is sourced and where it varies, see how IP geolocation works. The rest of this tutorial is the IP kind.
Prerequisites
Node.js 18 or newer, which ships a global fetch (the SDK uses it), a free API key, and npm. The Node examples run anywhere Node does; the browser pattern needs a small backend, which the Express section covers.
Get a free IPGeolocation.io API key
Create a free IPGeolocation.io account and copy a key from the dashboard. No card required. The free tier is 1,000 credits a day (one per lookup, reset at 00:00 UTC) and covers everything in the core walkthrough: location, country metadata, currency, basic ASN, and time zone.
Paid plans add company and network data, bulk lookups, the security (VPN, proxy, threat) and abuse modules, and non-English responses; compare tiers on the pricing page. Keep the key in an environment variable so it never lands in your source or git history. The examples read it from IPGEOLOCATION_API_KEY.
export IPGEOLOCATION_API_KEY="your_api_key_here"
Install the JavaScript SDK
Install the official JavaScript SDK. It ships ESM, CommonJS, and TypeScript declarations, and returns typed objects so your editor autocompletes the response.
npm install ip-geolocation-api-javascript-sdk
Import it with ES modules:
import { IpGeolocationClient } from "ip-geolocation-api-javascript-sdk";
Or with CommonJS:
const { IpGeolocationClient } = require("ip-geolocation-api-javascript-sdk");
On TypeScript projects, the TypeScript SDK (ip-geolocation-api-sdk-typescript) gives you the same client with first-class typed request and response models.
Your first IP lookup in Node.js
Here is a complete server-side lookup: the key comes from the environment, the call is wrapped so a bad key or a network hiccup never crashes the process, and the client is closed when you are done.
import {
  IpGeolocationClient,
  UnauthorizedError,
} from "ip-geolocation-api-javascript-sdk";

async function geolocate(ip) {
  const client = new IpGeolocationClient({
    apiKey: process.env.IPGEOLOCATION_API_KEY,
  });

  try {
    const response = await client.lookupIpGeolocation({ ip });
    const location = response.data.location;

    console.log(location?.countryName, location?.city); // United States Mountain View
    console.log(response.data.timeZone?.name); // America/Los_Angeles
    return response.data;
  } catch (error) {
    if (error instanceof UnauthorizedError) {
      console.error("Check your API key:", error.apiMessage);
    } else {
      console.error("IP geolocation lookup failed:", error);
    }
    return null;
  } finally {
    await client.close();
  }
}

geolocate("8.8.8.8");
Two details matter. The response is typed, and optional objects are absent until you request them or your plan includes them, so location?.city uses optional chaining instead of assuming the field is there. And the client holds an open connection, so call close() when a short script finishes. In a long-running server you create the client once and keep it; you do not open one per request.
Look up the caller's IP
Leave out ip and the API geolocates whoever made the request, which is your server's own public IP. It is handy for a quick check, not for finding a visitor.
const response = await client.lookupIpGeolocation({});
console.log(response.data.ip); // your server's public IP
Get the visitor's real IP (Express and Next.js)
Geolocating a fixed address like 8.8.8.8 is trivial. Finding the real visitor is the part that trips people up: behind a load balancer or CDN, the connecting socket belongs to the proxy, so the visitor's address arrives in the X-Forwarded-For header instead. That header is easy to forge on a direct request, so trust it only from proxies you control.
In Express, do not parse the header by hand. Set trust proxy to the number of proxy hops in front of you (or a trusted CIDR), and let Express resolve req.ip. Avoid trust proxy: true unless your edge proxy reliably overwrites the X-Forwarded-* headers, because otherwise a client can forge them.
import express from "express";
import { IpGeolocationClient } from "ip-geolocation-api-javascript-sdk";

const app = express();

// Trust exactly the proxies in front of your app. 1 = a single load balancer or CDN.
// Prefer a hop count or CIDR; `true` is safe only if your edge proxy overwrites X-Forwarded-* headers.
app.set("trust proxy", 1);

// Create the client once for the whole process, not per request.
const client = new IpGeolocationClient({
  apiKey: process.env.IPGEOLOCATION_API_KEY,
});

app.get("/api/geo", async (req, res) => {
  const ip = req.ip; // resolved from X-Forwarded-For using your trust setting

  try {
    const response = await client.lookupIpGeolocation({ ip });
    res.json({
      ip,
      country: response.data.location?.countryName ?? null,
      city: response.data.location?.city ?? null,
    });
  } catch (error) {
    console.error("Geolocation failed for", ip, error);
    res.status(502).json({ ip, country: null, city: null });
  }
});

app.listen(3000);
Express documents the trust settings in its behind proxies guide. Which entry in the chain you can actually trust, and how to set it for Nginx, Cloudflare, and other proxies, is its own topic; we cover it in getting the real client IP behind a proxy.
On Next.js, read the client IP in a route handler. On a managed platform like Vercel, the platform populates x-forwarded-for with the real client IP, so reading it here is safe. Only trust this header when your platform or reverse proxy overwrites it; if you run your own proxy, apply the trusted-proxy rules from the guide above instead of trusting the raw header.
// app/api/geo/route.js (Next.js App Router)
import { IpGeolocationClient } from "ip-geolocation-api-javascript-sdk";

const client = new IpGeolocationClient({
  apiKey: process.env.IPGEOLOCATION_API_KEY,
});

export async function GET(request) {
  const forwarded = request.headers.get("x-forwarded-for") ?? "";
  const ip = forwarded.split(",")[0].trim();

  if (!ip) {
    return Response.json({ error: "No client IP" }, { status: 400 });
  }

  try {
    const response = await client.lookupIpGeolocation({ ip });
    return Response.json({
      ip,
      country: response.data.location?.countryName ?? null,
    });
  } catch (error) {
    console.error("Geolocation failed for", ip, error);
    return Response.json({ ip, country: null }, { status: 502 });
  }
}
IP geolocation in the browser without exposing your key
You can run the SDK in any runtime with fetch, including the browser. The catch is the API key. If you put it in a front-end fetch, anyone can open dev tools and read it. If you have ever shipped a key that way, you are in large company, but it does mean strangers can spend your quota, so treat the browser as untrusted and keep the key on the server.
There are two correct patterns. The first works on the free tier: the browser calls your own backend, and the backend (the Express or Next.js handler above) holds the key and does the lookup.
// Browser: call your own endpoint, never the IP geolocation API directly.
const res = await fetch("/api/geo");
const geo = await res.json();
console.log(geo.country);
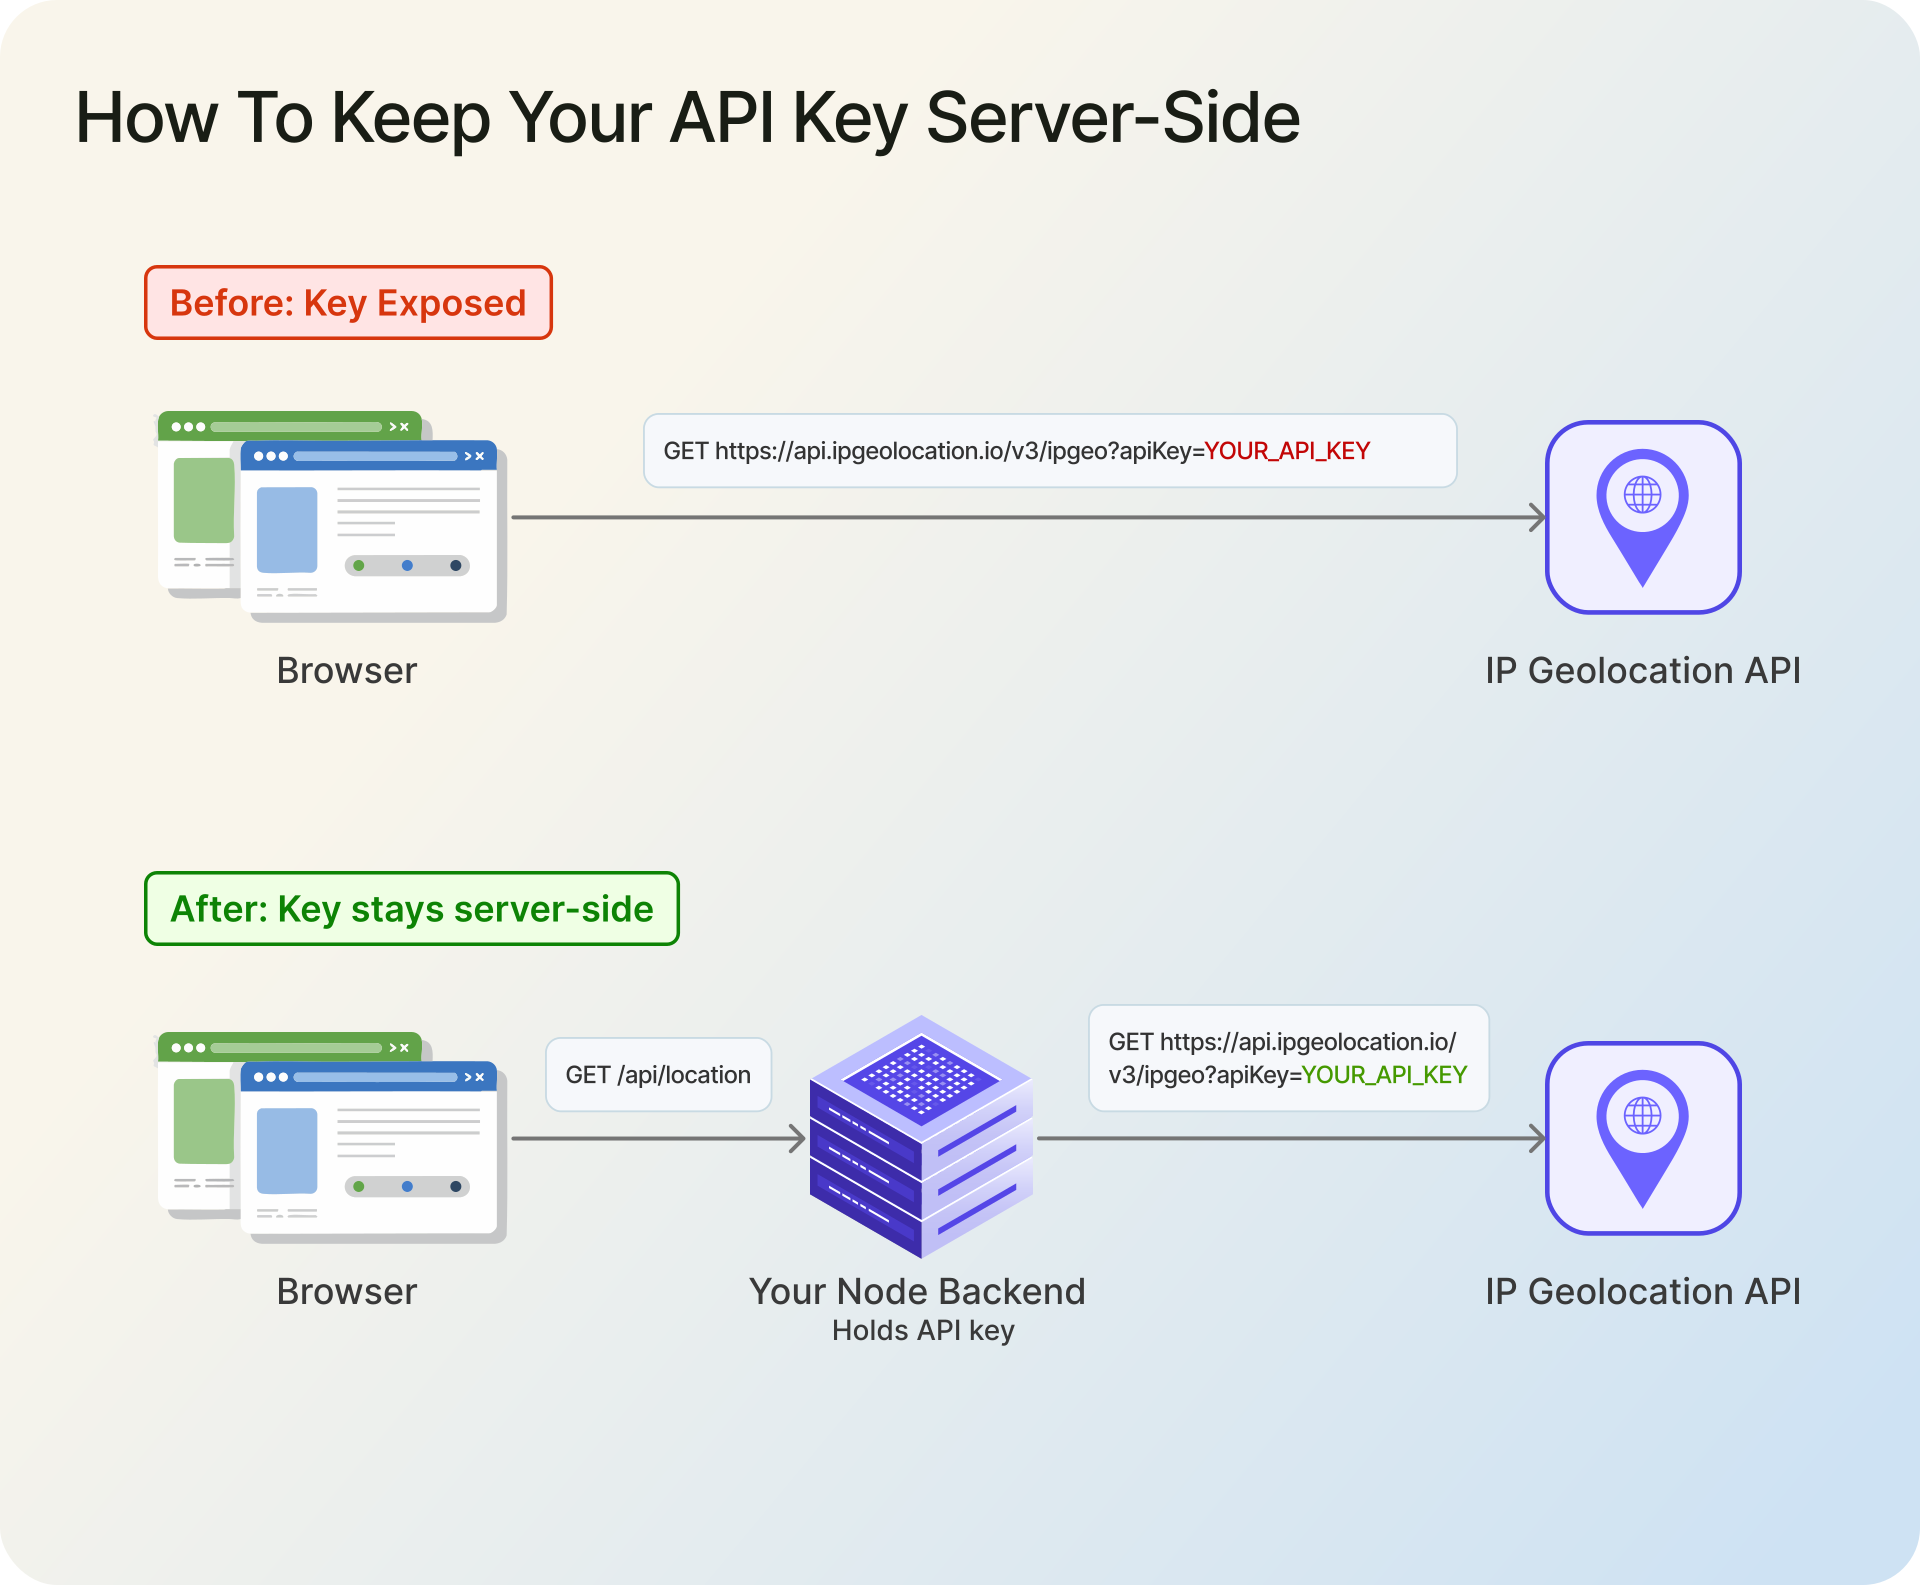
The second is request-origin auth, a paid-plan feature for single lookups: you authorize an allowlisted origin instead of shipping a key, so the browser can call the API directly.
import { IpGeolocationClient } from "ip-geolocation-api-javascript-sdk";

// Paid plans only, single lookups. Authorizes by origin, no key in the page.
const client = new IpGeolocationClient({
  requestOrigin: "https://app.example.com",
});

const response = await client.lookupIpGeolocation({ ip: "8.8.8.8" });
console.log(response.data.location?.countryName);
What a lookup returns
A default lookup returns more than most apps use. This trimmed example shows the objects the free plan returns:
{
  "ip": "8.8.8.8",
  "location": {
    "country_name": "United States",
    "state_prov": "California",
    "city": "Mountain View",
    "latitude": "37.42240",
    "longitude": "-122.08421"
  },
  "country_metadata": { "calling_code": "+1", "languages": ["en-US", "es-US", "haw", "fr"] },
  "currency": { "code": "USD", "name": "US Dollar", "symbol": "$" },
  "asn": { "as_number": "AS15169", "organization": "Google LLC" },
  "time_zone": { "name": "America/Los_Angeles" }
}
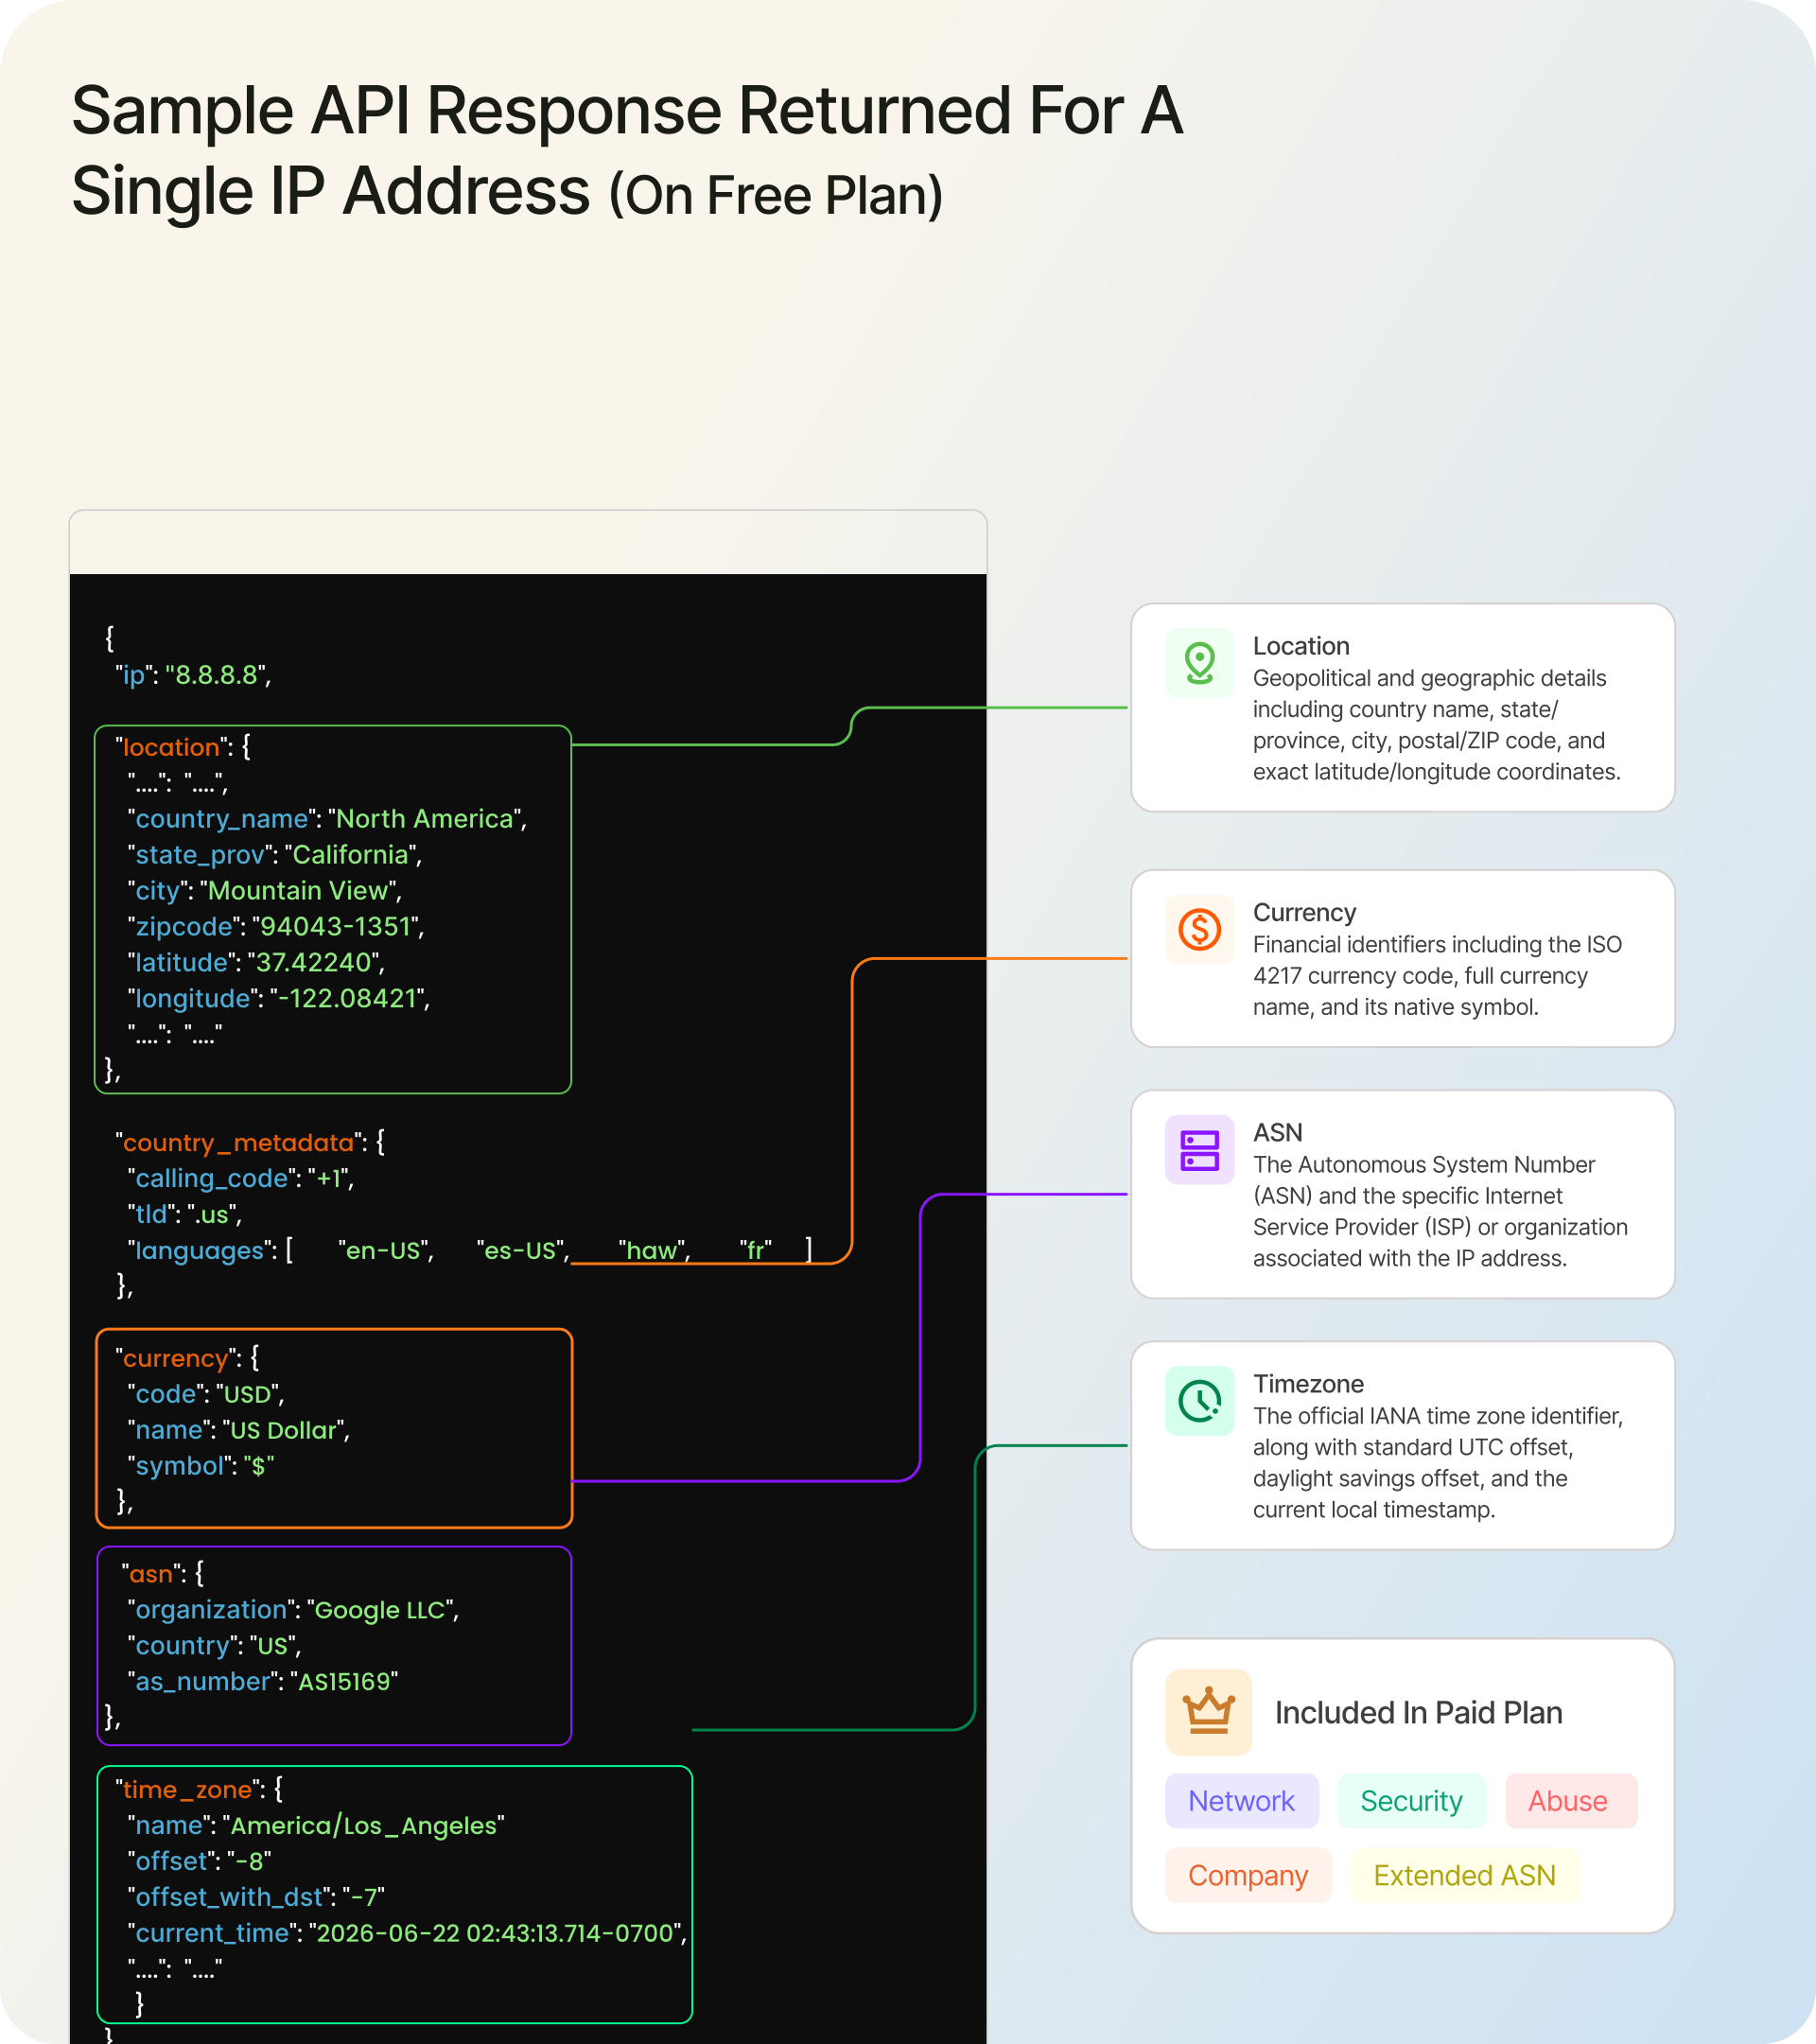
The SDK hands these back as typed, camelCase objects, so response.data.location?.countryName gives United States and response.data.timeZone?.name gives the zone. Paid plans add company and network, with security and abuse available through include. If you only need a couple of fields, trim the response with fields; note the field paths use snake_case even though the accessors are camelCase.
const response = await client.lookupIpGeolocation({
  ip: "8.8.8.8",
  fields: ["location.country_name", "location.city", "time_zone.name"],
});

console.log(response.data.location?.countryName, response.data.timeZone?.name);
IP geolocation in JavaScript without the SDK (raw fetch)
If you would rather not add a dependency, call the endpoint directly with fetch. Keep the key server-side, set a timeout, and check the status before reading the body.
const API_KEY = process.env.IPGEOLOCATION_API_KEY;

async function geolocate(ip) {
  // Build the query with URLSearchParams so values are encoded (IPv6 colons, etc.).
  // The key rides in the query string, so avoid logging this full URL.
  const params = new URLSearchParams({ apiKey: API_KEY, ip });
  const url = `https://api.ipgeolocation.io/v3/ipgeo?${params}`;

  try {
    const res = await fetch(url, { signal: AbortSignal.timeout(5000) });
    if (!res.ok) {
      throw new Error(`IP geolocation API returned ${res.status}`);
    }
    const data = await res.json();
    return data.location?.country_name ?? null;
  } catch (error) {
    console.error("IP geolocation request failed:", error);
    return null;
  }
}
The raw endpoint returns snake_case fields (location.country_name), and you handle parsing, timeouts, and errors yourself. The SDK adds typed responses, validation, and named error classes, which is why the rest of this tutorial uses it.
Errors, timeouts, and retries
The SDK does not retry for you, which is the right default: it raises typed errors and lets you decide what to do. Back off on the transient ones (server errors, timeouts, network failures) and fail fast on the ones a retry will not fix, like a bad key. For HTTP 429 (RateLimitError), stop retrying and check the credit allowance or overage limit. Resume after the allowance resets or the limit is changed.
import {
  IpGeolocationClient,
  RateLimitError,
  ServerError,
  RequestTimeoutError,
  TransportError,
  UnauthorizedError,
} from "ip-geolocation-api-javascript-sdk";

const client = new IpGeolocationClient({
  apiKey: process.env.IPGEOLOCATION_API_KEY,
  connectTimeoutMs: 5000,
  readTimeoutMs: 5000,
});

async function lookupWithRetry(ip, attempts = 3) {
  for (let attempt = 1; attempt <= attempts; attempt++) {
    try {
      return await client.lookupIpGeolocation({ ip });
    } catch (error) {
      const transient =
        error instanceof ServerError ||
        error instanceof RequestTimeoutError ||
        error instanceof TransportError;

      // RateLimitError is HTTP 429: the credit allowance or overage limit is used up.
      // Like a bad key, retrying in a few seconds will not fix it.
      if (
        error instanceof RateLimitError ||
        error instanceof UnauthorizedError ||
        !transient ||
        attempt === attempts
      ) {
        throw error;
      }

      await new Promise((resolve) => setTimeout(resolve, 2 ** attempt * 250)); // 0.5s, 1s, 2s
    }
  }
}
Every response also carries metadata: response.metadata.creditsCharged tells you what the call cost, and response.metadata.firstHeaderValue(name) reads any response header the API includes.
Production checklist
The handful of things that separate a demo from code you can ship:
- Shipping the key to the browser. Keep it server-side behind your own endpoint, or use request-origin auth on a paid plan.
trust proxy: true. Scope it to your real proxy hops or a CIDR, so a forgedX-Forwarded-Forcannot set the visitor IP.- Sending private or reserved IPs. Validate the address first; a private IP has no public location.
- Fetching everything every time. Cache results per IP to save credits, and use
fieldsto reduce payload and latency. - Treating IP geolocation as exact. It is approximate, especially on mobile and VPN traffic, so do not make it your only fraud or access-control signal.
- Bundling an offline IP database and forgetting it. Offline databases need regular updates. A location-only database has no VPN or threat fields; use the IP Security Database when you need those signals locally. The tradeoff is real, and an IP geolocation API versus a local database walks through when each fits.
Examples tested with ip-geolocation-api-javascript-sdk 3.0.1 on Node.js 18.20.8.
Going further: security, abuse, and bulk
Three paid add-ons extend the same client once you outgrow plain geolocation. Each links to its own reference rather than a worked example here:
- VPN, proxy, and threat detection: add
include: ["security"]for asecurityobject withthreatScore,isVpn,isProxy, andisTor. See the IP Security API. - Network abuse contact: add
include: ["abuse"]for the reporting contact behind an IP range. See the Abuse Contact API. - Bulk lookups: call
bulkLookupIpGeolocation({ ips: [...] })for up to 50,000 IPs in one request, with a success or error result per IP.
FAQ
How do I get IP geolocation in JavaScript?
Install ip-geolocation-api-javascript-sdk, create an IpGeolocationClient with your API key, and call lookupIpGeolocation({ ip }). Read response.data.location, timeZone, currency, and asn. Run it in Node.js with the key in an environment variable. The free tier allows 1,000 credits a day, reset at 00:00 UTC, with no card.
How do I get the visitor's real IP in Node.js or Express?
Set a scoped trust proxy in Express (the number of proxy hops, or a CIDR, never true), then read req.ip and pass it to the API. That resolves the client IP from X-Forwarded-For only for proxies you trust, instead of a value a client can spoof.
Is there a free JavaScript IP geolocation API?
Yes. The free tier gives 1,000 credits a day (reset at 00:00 UTC) with no credit card and returns location, country metadata, currency, basic ASN, and time zone for any IPv4 or IPv6 address. VPN, proxy, and threat detection, abuse contact data, and bulk lookups are paid.
Can I do IP geolocation in the browser without exposing my API key?
Yes, two ways. On the free tier, have the browser call your own backend, which holds the key and does the lookup. On a paid plan, use request-origin auth, which authorizes an allowlisted origin so no key ships in your front-end code. Never put the key in browser fetch.
Does it work with IPv6 and in Next.js?
Yes to both. Pass an IPv6 address as ip exactly like IPv4, on the free and paid plans. In Next.js, read the client IP from x-forwarded-for in a route handler (your platform sets it), then pass that IP to the SDK the same way the Node example does.
What is the difference between navigator.geolocation and IP geolocation?
navigator.geolocation is the browser API: it returns device coordinates that can be very precise, but it requires the user's location permission and runs only client-side. IP geolocation maps an IP address to a city-level location server-side with no prompt. Use the browser API for maps, IP geolocation for localization, analytics, and access control.
Next steps
Grab a free API key, run the Node example, then wire in the visitor-IP step for your framework. From here, the tutorial series covers the same workflow in other languages, including IP geolocation in Python and IP geolocation in PHP.